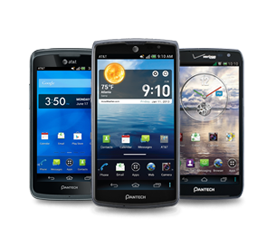
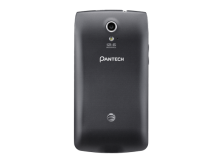
Introducing a phone that provides stunning images, amazing video, luxurious sound, and premium features – everything you want in a smartphone for up to $150 less than the competition.
Get the fastest and smoothest version of Android yet with great new features like: Google Now, Expandable Notifications, Improved Voice Search, Data and Battery Manager apps, AT&T Drive Mode.
Check your Pantech Discover Notification Panel for updates.

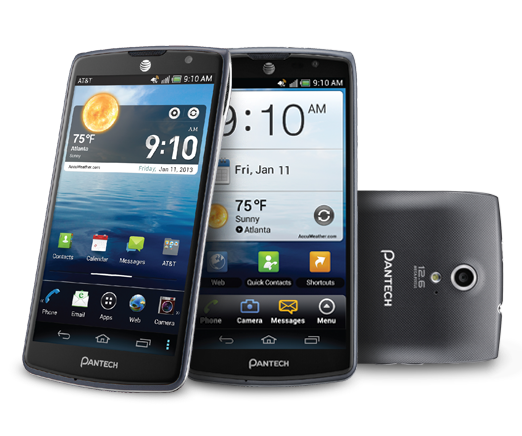
You live an exciting life, so why would you rely on a sub-par camera phone to capture and share your most incredible moments? With a 12.6 MP camera with 4x zoom and an LED flash, the Discover lets you take panoramic, High Dynamic Range (HDR) images with multiple shutter modes and advanced editing features, allowing you to take great pictures no matter the situation.
And with a powerful 2,100 mAh Lithium Ion battery with up to 430 hours in standby mode, you’ll never run out of power when you need it most.
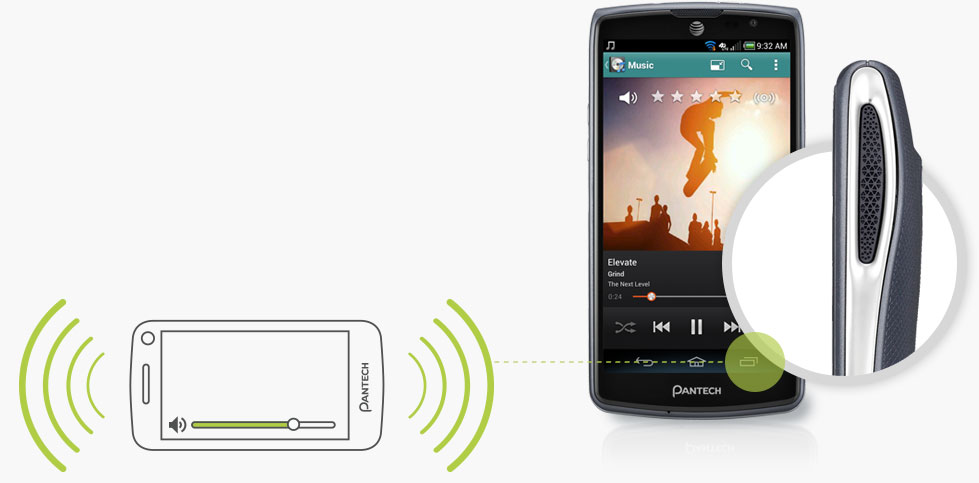
There’s nothing worse than huddling around a weak smartphone speaker trying to hear what’s going on. With the Pantech Discover, you get dual 3D surround sound speakers that offer a dynamic, full-bodied listening experience. Features like treble enhancement, bass boost, and a loudness maximizer mean you get rich, natural 3D audio with full cinema surround sound.
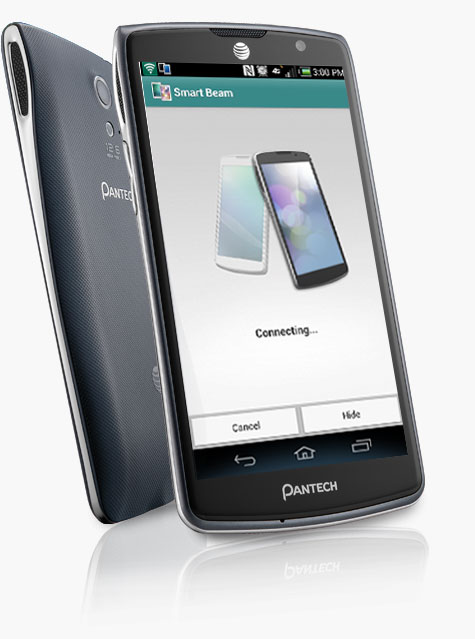
With near field communication (NFC) capabilities, the Pantech Discover will help simplify some of the most common tasks in your life. Share pictures, music, documents and YouTube links with nearby friends, execute simple tasks with programmable smart tags, or pay for goods and services directly from your phone.
And the Discover’s exclusive Easy Experience user interface means you won’t have to scroll all day to find what you’re looking for. So what are you going to do with all that extra time?
*Contents on Music, Gallery, ThinkFree, Video, and Memo may or may not be transferred to other devices through NFC.
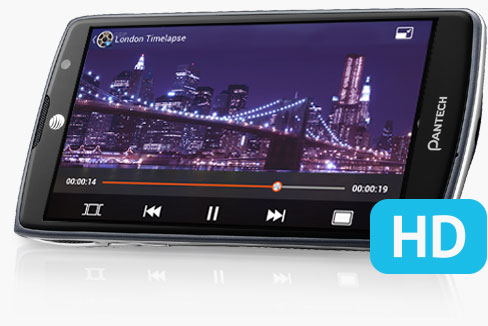
Whether you’re watching a viral YouTube video or playing the latest video game, you want a screen that lets you see every detail. The Pantech Discover’s gorgeous 4.8" high-definition display and 1,280 x 720 pixel resolution means that movies, TV shows and videos come through with stunning clarity.

We know that you work as hard as you play. That’s why we equipped the Pantech Discover with full VPN (Virtual Private Network) and EAS (Exchange Active Sync) support so that you can have secure access to your corporate email and intranets at all times. The days of being tied to the office are over. Now that you can stay connected to work no matter where you are, you’re free to work smarter and play harder!


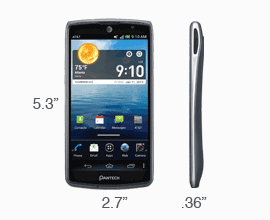
| Height | 5.3" |
|---|---|
| Width | 2.7” |
| Depth | 0.36” |
| Weight | 4.76 oz. |
| Display Size | 4.8” |
|---|---|
| Resolution | 1280 x 720 Pixels |
| OS | Android OS |
|---|
| Cellular Technology | 4G LTE, 3G, GSM/GPRS |
|---|---|
| WI-FI Enabled |
|
| Bluetooth |
|
| Text Messaging |
|
|---|---|
| Instant Messaging (IM) |
|
| Mobile Email |
|
| Web Browser |
|
|---|---|
| Preloaded Apps |
|
| Camera Resolution | 12.6 MP (Rear), 2 MP(Front) |
|---|---|
| Zoom | 4x |
| Video Capture | 1080p HD |
| Video Player |
|
|---|---|
| Music Player |
|
| Speakers |
|
| Battery Type | Lithium Ion: 2,100 mAh |
|---|---|
| User Talk Time | Up to 10 hours |
| Standby Time | Up to 430 hours |
| Format | 16 GB w/ 13 GB end-user memory |
|---|
| Keyboard | Touchscreen |
|---|---|
| Predictive Text |
|
| External Memory | 32 GB (Micro SD) |
|---|

"The Pantech Discover, the most smartphone you'll get for $50 with contract."

"Announced early Monday morning at AT&T's developer summit, the Pantech Discover may not seem like much at first, but this slick new smartphone has a lot to offer."
"The AT&T-bound handheld only has a 720p screen, a dual-core CPU and Android 4.0 ICS, but we’re here to tell (and show) you this is not a device that will get lost in the crowd."
"Pantech may not be looked upon as a Samsung or Apple when it comes to handsets, but the AT&T Discover may help change the perception that the company makes only low-end smartphones."
"The Pantech Discover is on its way to AT&T. At CES Monday the carrier announced plans to start carrying the Android handset on January 11."
"This machine has a 720p display and a massive 13 megapixel camera and it’ll all be delivered for a mere $50 USD."
"One of Pantech's most ambitious smartphones yet, AT&T's Pantech Discover combines a 4.8-inch 720p HD display with a 12.6-megapixel camera on a 4G LTE, Android handset."
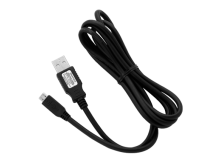
The micro-USB to USB Charging Data Cable connects your Pantech device to your Pantech wall charger for the best possible charging experience. The USB Charging Data Cable also allows you to transfer data files such as music, video, image, etc…between your Pantech device and a compatible PC via USB.

Pantech's Lithium Ion battery is designed to give you the best performance possible. This Lithium Ion battery is specifically engineered for your Pantech mobile phone to deliver the most reliable and long lasting power. (2100 mAh)
The Pantech Discover Replacement Battery Cover is engineered to offer protection for your 2100mAh Lithium Ion battery. The Pantech Original cover contains a built-in NFC antenna which allows your Discover's NFC features to function properly.
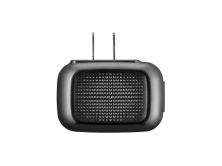
Don’t risk a dead battery at the moment when you need your cell phone the most. By keeping the Pantech Wall Charger handy while at home or at the office, you can be sure that your Pantech device’s battery life is topped off and you're ready to go at a moment's notice.
To order accessories for your Pantech Mobile device email or call 9:00 AM – 6:00 PM CST Mon through Fri
Go to Settings, then USB Connection Settings. Select “Media Device (MTP)”. When the Discover is in “MTP” Mode, files can be moved between the Discover’s Internal Memory or SD Card, and a connected PC using the USB cable. The Discover can also sync with your music files using Windows Media Player.
A PC with Windows XP and Service Pack 3 (SP3) or later operating system is required.
Yes. The Portable Wi-Fi Hotspot is standard on the Discover. You may need to upgrade your data plan to meet AT&T's requirements for supporting Wi-Fi Hotspots. Devices connected to your Discover will use data from your plan. Check with AT&T for more information on plans and services.
To turn mobile hotspot on:
1. Go to Settings.
2. Tap More.
3. Tap Tethering & portable hotspot.
4. Tap Portable Wi-Fi hotspot to turn on.
[Note: Once portable Wi-Fi hotspot is turned on, the Wi-Fi icon will display in the notification bar. If your account is not provisioned properly, a notification message will display advising you to contact customer care.]
5. Tap Portable Wi-Fi Hotspot settings.
6. Tap Configure Wi-Fi hotspot / Set up Wi-Fi hotspot.
7. Configure the portable hotspot as desired, and then tap Save.
Network SSID: Enter the desired name for your Wi-Fi hotspot.
Hide SSID: Hides the network from view to prevent unwanted access or data usage.
Security: Tap to select the desired security option: None or WPA2 PSK.
Password: Enter the desired password for your Wi-Fi hotspot.
NOTE: It is recomended to enable security to prevent unintended data usage.
8. Connect your Wi-Fi devices as desired, and access the internet.
Turn off mobile hotspot:
1. From any screen, drag down the notification bar, and then select Tethering or hotspot active.
2. Tap Portable Wi-Fi Hotspot to turn off.
3. Tap home icon to return to the home screen.
Here are some tips to improve your battery life:
- For best performance, always use the Pantech authorized AC charger.
- Make sure your battery is fully charged before use.
- In Settings > Display, Adjust the sleep setting to a shorter time (for the screen to automatically turn off).
- Close all applications before turning the screen off.
- Lower the screen brightness.
- Turn off Wi-Fi and Bluetooth when not in use.
- Turn off GPS location service when not in use.
- Do not set Live Wallpaper on a home screen.
1. Tap Apps > Settings > Apps > Running.
2. Find out what applications are running in the background and tap the application you want to stop.
3. Tap Stop > OK to confirm.
If application files (.apk file) exist on your PC, you can install them on your phone using your micro USB data cable.
1. Connect the phone to PC via USB data cable.
2. Tap Menu (bottom right corner) > Settings.
3. Scroll to and tap USB connection settings.
4. Tap Media device (MTP).
5. On your PC, access "Computer", and then double click PANTECH (P9090).
6. Select the desired storage space.
7. Navigate to the desired media files.
8. Drag and drop the desired media files or folders to the device window.
Tap Apps > Voice Dialer.
Wait until you see Listening on your screen and say a command.
[Note] Examples of commands are shown on your screen to give instructions.
Please say Call in front of person names, Dial in front of numbers and Open in front of application names.
Yes – “NFC” Near Field Communication is standard on the Discover. You can use “NFC” to share content with another “NFC” Enabled Device. To enable NFC:
1. Tap Settings>More>Select NFC
2. Android Beam (below NFC) should also be enabled now.
3. The NFC icon will appear above the main display area now.
To transfer a file:
1. Select and open the file you want to transfer.
2. Place the back of your phone against the back of another phone that supports the Smart beam functions.
3. When the message “ “ appears, tap the screen.
4. Once completed, the transferred file will automatically open.
5. Tap Confirm.
*Contents on Music, Gallery, ThinkFree, Video, and Memo may or may not be transferred to other devices via NFC.
1. Tap Apps > Settings > Storage.
2. Tap Unmount SD card first and then tap Erase SD card.
[Note] Please note that format will erase all data in your microSD card and will not restore any information.
To bookmark a website:
1. Tap Web > Star Icon.
2. Rename the label, enter the address and tap OK to save the bookmark.
To edit/delete a bookmark:
1. Tap Web.
2. Tap Menu icon (on the top right side of your screen).
3. Tap and hold the bookmark you want to edit/remove.
4. Tap Edit bookmark or Delete bookmark and OK.
1. Tap Apps > Contacts > Select a contact.
2. Tap Menu (top right corner) > Set ringtone.
3. Scroll list to choose ringtone > Press Ok.
In order to backup your device settings and contacts you must have an active Gmail account on your device.
To sync your contacts and settings:
1. Tap on Settings>Accounts & Sync.
2. Tap on Gmail email address.
3. Select Settings you want to sync.
4. Select Home button.
When the Wi-Fi signal is not optimal, the device may periodically disconnect from the Wi-Fi access point. This is controlled by the Wi-Fi Signal Filter settings.
OS 4.X (Ice Cream Sandwich): Settings>Wi-Fi. In the bottom right hand corner of the display, press “Menu” icon (3 small boxes) and select Advanced. Select Wi-Fi Signal filter and choose “Poor” signal.
OS 4.1.2 (Jelly Bean): Settings>Wi-Fi. In the bottom right hand corner of the display, press “Menu” icon (3 small boxes) and select Advanced. Avoid poor connections should not be checked.
When you are not able to re-connect to a Wi-Fi hotspot, restart the connection process. Turn Wi-Fi OFF and then back ON to re-connect.
Go to Settings>Wi-Fi. Press and hold on/off slider bar to off position. Then press and hold on/off slider bar to on position.
NOTE: The factory data reset erases all user information such as apps, music, pictures and user settings. The reset may take up to 15 minutes depending on the amount of user data (apps, music, pictures, etc…) stored in memory.
With the device on:
1. From the home screen, tap Apps.
2. Select Settings.
3. Scroll down the page.
4. Tap Backup and reset.
5. Under Personal Data, tap Factory data reset.
6. Tap Reset phone.
Pictures and videos are automatically saved onto the microSD card mounted in your device (under the file name sdcard:\DCIM\Camera).
To change this directory:
1. Tap Camera icon.
2. Tap the magnifier icon > Settings > Save Location.
3. Choose a folder and tap Ok.
Your Pantech Discover comes with Bluetooth® 2.1 with Enhanced Data Rate.
Supported profiles are:
- OPP (Object Push) for file transfer
- A2DP for wireless stereo headsets
Other supported profiles are AVRCP, GAP, HSP, SPP, HID, Service Discovery Application Profile
The extended home screen is made up of multiple customizable home screens. You are unable to add additional screens or delete them.
You may customize the extended home screens by adding your favorite applications, wallpapers, and widgets.
Slide your finger across the top of the home screen to move to change to a different extended screen.
You can identify which home screen you are on by the highlighted dots at the top of your screen.
1. Settings > Developer options > Turn on USB debugging.
2. Connect phone to PC using USB cable.
3. Select Camera (PTP) USB connection settings.
4. Once iPhoto opens, select photos you wish to import.
5. Select Import.
No power symptoms may be caused by an application or software freeze, extremely low battery charge and least likely, a hardware failure. As these steps are easy and effective, software freezing and low battery causes should be checked first. If these are not successful, your device may have suffered a hardware failure.
Check the charger and cable. Use the correct Pantech charger and cable.
-Pantech P9090 Discover charger model # PTA-5010MU1US
Plug the charger into a wall socket. Plug the micro-USB cable into your phone. Near the upper left corner of the display, there is a red LED to indicate charging. Is this red LED visible now?
- Yes –allow the phone to charge for at least 1 hour, then power it up. If this is not successful, go to step 3.
- No – Disconnect the phone from the charger cable. Plug the cable into a different, compatible Pantech device that you know is working. Do you see the charging icon or LED on this device?
- Yes –Your Pantech P9090 Discover charger seems to be working. Continue to step 3
- No – the charger or cable are bad. Contact Pantech Customer Care for assistance to obtain a replacement.
NOTE: If the phone begins to boot up, and then automatically shuts down again – the battery voltage is probably too low. Continue charging the phone battery for at least 1 hour.
If following these steps has not worked, contact Pantech Customer Care to obtain Warranty repair service. Your phone or charger may have suffered a hardware failure.
Tap Apps > Settings > Display.
In this section, you will find options to alter the Brightness, Wallpaper, Auto-rotate screen, Sleep interval, and Font size.
[Note] Depending on the backlight settings, your tablet battery life will differ.
To preserve the battery power, adjust to lower Brightness, No wallpapers, and the shortest Display sleep interval.
1. Tap Apps > Play Store > Menu (on the top right side of your screen) > My apps.
2. Select the item you want to remove from your phone.
3. Tap Uninstall > OK to confirm.
You can manage your schedule using Calendar on your Pantech Discover.
To set up Calendar on your phone:
1. Tap Apps > Calendar > Menu > Calendars to display.
2. Select an account to sync with your phone's calendar and follow the prompts to set up.
To create an event:
1. Tap Apps > Calendar.
2. Tap a day in the calendar that you want to add an event to and tap New event icon (on the upper right of your screen).
Or; Simply tap and hold on a day.
3. Enter necessary information and tap Done.
4. A colored dot will appear on the calendar to indicate the event for the day.
To view and edit/delete an event:
1. Tap Apps > Calendar.
2. Tap a day that you want to view events for the day. Tap Week, Month or Day if you want to see events for that period.
Tap Search icon (the magnifier icon) if you want to search events.
3. Within the selected day, tap the event that you want to edit. Tap Details > Edit button. Edit the event and tap Done.
Or; Simply tap the Delete button.
To configure settings for Calendar:
1. Tap Apps > Calendar.
2. Tap Menu (on the tip right corner of your screen) > Settings.
3. Tap General Settings and change the settings if you want.
You may request a refund within a short time after your purchase (e.g. within 15 minutes after your purchase):
1. Tap Apps > Play Store > Menu (on the top right side of your screen) > My apps .
2. Downloaded applications list will appear on the left. Select the app for which you want a refund
3. Once the refund is processed the application will be uninstalled from your phone.
[Note] Refund policy is prescribed by Google™ or the developer of the application, and Pantech is not responsible for processing the refund for paid applications.
Yes. All previously downloaded applications are listed and available for download without being charged again :
1. Tap Apps > Play Store > Menu (on the top right side of your screen) > My apps.
2. Select the app you want to reinstall.
Play Store is an application that links to the Android Market™ where an Android user can download applications (for free or by purchase).
[Note] You need at least one Google account (active user ID and password for Gmail) on your device to access Play Store.
If you already have a registered account, sign in. If you do not have an account, create one first and sign in.
All applications are by default saved in the internal memory. You can view this list in Settings > Apps.
To view only the applications downloaded from Play Store, tap Download icon > All.
Yes. Performing a factory reset will reset your device to out of box default settings.
Syncing with your Google account will allow you to retrieve data previously saved to your device such as contacts, calendar events, and images.
First, tap Camera icon.
- Tap the magnifier icon to zoom in and/or out on camera.
- Tap the brightness icon to change the lighting on camera.
Tap Settings dropdown arrow icon view additional settings:
- Tap Options to change White Balance, Timer, Flash and Resolution settings.
- Tap Mode, Effects and Settings to change more settings.
- Tap and hold on any icon and drag it to make a shortcut on your viewfinder.
1. Tap Apps > Settings > Bluetooth.
2. Turn on Bluetooth.
3. Tap Menu icon (bottom right corner) > Rename phone.
4. Enter a new name. Tap Rename.
1. Tap Apps > Settings > Bluetooth.
2. Turn on Bluetooth.
3. Your device should be in the top portion of the screen. Tap it to change whether its visible or not by others.
* Visibility timeout is optional. You can change this by accessing Visibility timeout via Menu icon (bottom right corner).
You can add multiple accounts on your Pantech Discover.
The number of accounts you can add is not limited, but adding multiple accounts may cause a decrease in the performance of your device.
To add an account:
1. Tap Settings > Add account.
2. Choose an account type and finish the setup.
To remove an account:
1. Tap Settings > Accounts > Choose type of account you want to remove.
2. Tap an account you want to remove.
3. Tap Menu icon (on the top right of your screen) > Remove account.
Yes. To create a signature:
1. Tap Apps > Email.
2. Tap Menu (on the top right of your screen) > Settings.
3. Choose account you want to add signature to.
4. Choose Account settings.
5. Tap Signature.
6. Tap Edit Signature to compose your own signature and tap OK.
1. Connect your phone to a PC with the data cable.
2. Choose External memory (SD card) for USB connection setting.
3. Tap Turn on USB storage button.
4. On your PC, go to My Computer and locate "Removable Disk Drive" icon. Click to open the list of files stored on your microSD card.
5. Open the folders and make desired changes.
1. Tap Apps > Contacts > Menu (on the top right of your screen) > Share contact.
2. Choose contact to share and tap checkmark.
3. Select among Bluetooth, Email, Gmail and more to share contact.
You can protect your phone from unauthorized use by locking it with your own Android pattern lock.
1. Make sure you have set up your Google account to sync with your tablet first. When you forget the unlock pattern, your Google account information will be the only key to unlock the phone.
2. Tap Settings > Security > Screen lock > Pattern.
3. Draw your own lock pattern and confirm it.
4. Tap Make pattern visible if you want the phone to show your trace as you draw your unlock pattern.
5. Tap Automatically lock to set a time interval before your screen is locked.
6. Tap Vibrate on touch if you want the phone to vibrate as you draw your unlock pattern
7. Tap Owner info if you want to show your nickname on the lock screen.
You can locate the Android OS version under Settings > About phone > Android version.
Android 3.2.1 (Honeycomb)
Android 4.0.4 (Ice Cream Sandwich)
Android 4.1.2 (Jelly Bean)
1. Tap Web app.
2. Tap Menu (on the top right corner of your screen) > Settings > Privacy & security.
3. Select the data you want to clear (cache, history, cookie data, etc.) and tap OK.
Use two fingers on the touch screen in a pinching motion to zoom in, or the opposite to zoom out. You can also double tap the screen using one finger to zoom in or out.
[Note] Some webpages do not respond to multi-touch features to zoom in and/or out.
You can search for a keyword within Google, Amazon Kindle, Apps, Books, Browser, Contacts and Music using Google Search.
1. Tap Apps > Google.
2. Enter your keyword or use voice recognition (tap the microphone icon on right) and tap the "Go" icon (right arrow) on the right.
You can select the locations you want to search within your Pantech Discover.
1. Tap Apps > Google.
2. Tap Menu (on the top right corner of your screen) > Settings.
3. Tap Privacy & accounts and select Google location settings.
4. Select Access location and choose Ok.
To add a new VPN:
1) Tap Apps > Settings > More in Wireless & networks > VPN settings > Add VPN.
2) Fill out the required information to add the network. (VPN name, server, DNS search domains, etc.).
To connect to VPN:
1) Press the Menu key at the Home screen. Tap Settings > More in Wireless & networks > VPN settings.
2) Tap the saved VPN, enter your Username and Password and tap Connect.
3) To edit or delete the saved network, touch and hold on the saved VPN and choose Edit/Delete network.
1. On your home screen, tap and hold an empty space or; tap Menu icon in the right hand corner of home screen.
2. Tap Wallpaper.
3. Tap Gallery if you want to set your pictures saved in your phone as wallpaper. Choose a picture, resize it and tap Set Wallpaper.
You can also do this directly from the Gallery application. Tap Apps > Gallery. Tap Menu (on the top right of your screen) > Select item. Choose a picture, tap Menu, Set picture as, and tap Wallpaper.
4. Tap Live wallpapers or Wallpapers to use preset wallpapers that came with your phone. Choose one and tap Set wallpaper.
[Note] Live wallpapers will drain your battery more quickly than regular wallpapers.
To configure the roaming settings on your phone:
1. Tap Apps > Settings > More under Wireless & networks > Mobile networks.
2. Tap International Data Roaming to allow roaming services.
You can customize your home screen with widgets, wallpapers and selected applications:
1. On your home screen, tap and hold an empty space, flick the home screen upward, or tap the Menu icon (bottom right corner).
2. You can select any of the Apps, Widgets, Wallpapers and more to add to your home screen.
Your Pantech Discover supports:
- LTE Quad (700/850/1900/AWS) MHz
- 3G UMTS/HSPA+ Tri (850/1900/2100) MHz (21Mbps download speeds)
- GSM/GPRS/EDGE Quad (850/900/1800/1900) MHz
To sync your Pantech Discover with your google account:
1. Tap Apps > Settings > Google.
2. Tap your Google account.
3. Check categories you wish to sync.
Syncing is in progress once the circle begins to spin. Once complete, the circle will go away and you will see a time and date stamp beneath categories that were synced.
You can automatically receive the network date, time and time zone to your phone.
1. Tap Apps > Settings > Date & Time.
2. Tap Automatic date & time to turn it on.
3. Tap Automatic time zone to turn it on.
You can also manually select your date and time:
1. Tap Apps > Settings > Date & Time.
2. Tap Automatic date & time to turn it off.
3. Tap Set date and modify the date.
4. Tap Set time and modify the time.
Airplane mode helps you turn off all your wireless connections. This can be convenient on a flight.
1. Press and hold the Lock/PWR key for more than two seconds, then tap Airplane mode. Or:
2. Tap Apps > Settings > More > Select Airplane mode.
Note] Airplane mode will deactivate the cellular signal, Wi-Fi, Bluetooth and GPS functions all at once.
However, you can manually turn on each function for your preference.
Always charge your phone with the Pantech authorized AC charger provided in the gift box.
If you need an extra charger for travel, your office or any other reason - please check our Accessories link from the Support pages for your device.
In case your device would not power on, please try any of the steps below:
The latest software for your device is not available online. You can find your device software information in Menu > Settings > AT&T software update > Check for updates. If a new version is available for download, please update your device.
[Note] When downloading the software, we highly recommend you to connect to Wi-Fi network instead of using 3G network in order to fasten the download speed and avoid the heavy charges for using 3G data services.
Please make sure your battery is charged fully before use. Nevertheless, some features such as playing the media files, using camera or camcorder, running applications in the background, constantly syncing email and using Wi-Fi or Bluetooth, can drain the battery more quickly than usual.
Below suggestions would help conserve the power:
If your device has a problem not responding or slowing down, you may try a hard reset by removing and reinserting the battery.
If you would like to erase all data on your device, please do a Factory data reset. To do this, go to Settings. Tap Privacy > Factory data reset > Reset device > Erase everything. We recommend you back up your data before doing Factory data reset because it will delete your Google account information and all downloaded applications on your device including ringtones. However, factory data reset will not erase the data saved on the SIM card and microSD card.
Please try any of the steps below:
PC Suite enables communication between your device and compatible PC. Pantech PC Suite is the Windows based program that enables you to manage your device while connected to a compatible PC. For example, you can sync your outlook contacts with your phone's contacts using Pantech PC Suite.
Please download the compatible PC Suite with your Pantech Crossover and then connect to the PC:
[Note] PC Suite for the Pantech Crossover works with Windows 2000 or XP family, Windows7 and Vista 32 bit. Your PC must have minimum 300MB of free disk space to install PC Suite.
If your device is in use for prolonged periods of time (e.g. talking on the device, playing music or video, browsing the web, running applications or charging the battery), it may become warmer than when in standby mode. In most cases, this condition is normal and therefore not a failure of the device.
The SIM card is the Subscriber Identity Module card that you receive with your device upon activation. It contains your network registration information and PIN code. The SIM card is physically installed in your device and one of its primary functions is to identify your device uniquely - apart from all other devices on the carrier's network.
You are allowed to enter a pattern for five times and after that, you will be asked to wait for 30 seconds before you can try again. If you continuously enter the wrong pattern, your device will be permanently locked and only be unlocked with your Google account. In case you have forgotten the unlock pattern:
If you cannot recall the unlock pattern and has the Google account set up on your device, tap OK > Forgot Pattern? on the bottom of your screen. Sign in with your Google account and create a new unlock pattern. If you know your Google account address, but have forgotten the its password, please visit http://www.gmail.com on a computer. From the Gmail login page, click on the Can't access your account? and follow the prompts to have Gmail send you a password change request link to your other email address. When you have received a new login information, use that information to unlock your device following steps above.
If you cannot recall the unlock pattern and does not have the Google account set up on your device, there is no way to unlock the device. Please return your device to obtain repair or replacement service. Make sure to check with your carrier or Pantech technical support center if your device is eligible for warranty service.
[Note] Please try not to set up a complicated unlock pattern that is easy to forget. Your device will be still locked when restarted.
Please try any of the steps below, if your camera does not work:
Please try any of the steps below if your device screen is not responsive:
When Compass does not work correctly, hold your device and draw a 8 for 5 times in a non-magnetic environment. Make sure to use only your wrist.
[Note] There is no setting or application to adjust the digital compass sensor. While drawing 8, it will automatically make correction.
Make sure you are in a Wi-Fi service area and covered with strong Wi-Fi signal. The number of bars in Wi-Fi icon shows the signal strength.
If the problem is not solved, try any of the steps below:
[Note] If too many people are connected to one Wi-Fi network, your device may fail to access Wi-Fi due to congestion.
In case the PC Suite is not working correctly on your PC:
1. Make sure your device is disconnected from the PC first.
2. Uninstall the PC Suite from your PC.
3. Go to www.pantechusa.com and find the compatible PC Suite for your model.
4. Download and re-install the PC Suite and open it on your PC.
5. Connect your device to the PC with the USB data cable.
6. Wait for your PC to automatically search for the New Hardware Port and install the driver for your device. This takes 10-30 seconds according to PC specification.
7. When this is correctly installed, your device will automatically open the Data Manager application and appear Connected.
8. You can now make the desired changes via PC Suite.
Some applications do not allow keyboard/keypad inputs. Try working keys in other screen, and if the problem does not go away, restart your device after disconnecting the battery.
Try to power cycle your device using the normal on-off button or icon. If this doesn't work, you can force a hard reset by removing the battery, reinserting it, and turning the device on again. For devices with an internal battery which is not removable by the end user (e.g. Pantech P4100 Element tablet), please refer to the FAQs for your specific device.
If your device would not read the installed micorSD card, try any of the steps below:
Charging time varies for each device. Charging time will also vary depending on the battery's voltage when charging is started. Generally speaking, for all batteries and all battery conditions, a full charge should be completed in less than 4 hours using the Pantech AC charging adaptor. If you are charging with a USB cable connected to a PC, the time to achieve a full charge may be longer. In either case, it will take longer than usual if you use the device while charging.
[Note] If the battery level is 10% or below, charging with AC adaptor is highly recommended. For Tablets and Smart Phones which usually carry a high capacity battery, you should use the Pantech AC charging adaptor for the best possible performance.
Please try any of the steps below:
If your device memory is full, it cannot send and/or receive text message. Please delete any meessages currently in your inbox and outbox to enable messaging.
If the problem is not solved, please try any of the steps below:
[Note] Text messaging is the feature provided from your carrier. You may have to add this feature to your plan and make a payment. At times, it may be disabled due to the problem on the carrier's end.
Please try any of the steps below accroding to your problem:
Applications may come to shut down altogether at once when you are running several applications simultaneously. This happens due to the memory capability of the device and is not a defect to be repaired or exchanged with new device.
Try to power cycle your device using the normal on-off button or icon. If this doesn't work, you can force a soft reset by removing the battery, reinserting it, and turning the device on again.
If your device supports Bluetooth, your device has been basically tested and found to comply with the FCC and NAC. However, there is no gurantee that inteference will not occur in a paticualr installation.
In case Bluetooth connection is not functioning correctly, please try any of the steps below:
Please try any of the steps below and then send a test email:
The latest software for your device is not available online. You can find your device software information in Menu > Settings > AT&T software update > Check for updates. If a new version is available for download, please update your device.
Blocking the device part, where the internal antenna is embedded, may cause poor audio quality. Try not to attach a sticker or a protective film on the top of such part. Do not grab the device covering that part or touch it with finger or metal during the call. Please see where the internal antenna is embedded on your device from the user manual.
In case the PC Suite is not working correctly on your PC:
Make sure you are in the area with good cell signal. To ensure it, see the signal strength indicator on the top right of your device screen.
If the bar is full, then please try any of the steps below:
To display pictures stored on your microSD card using Gallery, make sure your device is not mounted as a USB storage device. (On the Pantech Crossover, turn off USB storage by tapping the Notification bar on top of your screen.) When connected to a PC and PC is reading memory, your device cannot access microSD card.
Applications may contain internal errors and do not open on your device. You can contact the developer of that application to report the errors:
If your device is in use for prolonged periods of time (e.g. talking on the device, playing music or video, browsing the web, running applications or charging the battery), it may become warmer than when in standby mode. In most cases, this condition is normal and therefore not a failure of the device.
Make sure you permit the screen to auto-rotate in Menu > Settings > Display.
[Note] Display does not rotate while on a call and if you are in Camera or S-Board application.
If your external keys or Home button are slow to respond, it may be due to applications running in the background. Please close all applications, turn off your device, remove and reinsert the battery and turn on the device. If the failure continues after all, your device may be defective and requires a repair service.
If an indivisual key is not functional, that key may be defective. and require a repair service.
Your device could drop calls, if you are outside or far from the call service area. Please check the signal strength indicator on your device screen and move to the area with good coverage.
Blocking the device part where the internal antenna is located, such as adding an attachment on it, touching it by finger or metal during the call, grabbing the device covering that part, may also drop the call signal. Please see where the internal antenna is embedded on your device from the user manual.
The GPS signal reception may be interfered by obstacles such as bridges, forests, rainy, foggy or cloudy weather, tunnels, high-rise constructions, mountains, etc. It also cannot penetrate through solid and non-transparent objects. Please avoid these objects or area when connecting to GPS satellites.
If your device seems slow, try any of the steps below to improve the speed:
If the website size is too big or requires certain technical specifications, it may not be viewable in your device.
[Note] The Pantech Crossover does not support Adobe Flash Player and thus, websites built on flash player are not displayed.
Please download the compatible PC Suite with your Pantech Breeze IV and then connect to the PC:
1. Go to www.pantechusa.com and find the compatible PC Suite for you model.
2. Download and install the PC Suite and open it on your PC.
3. Connect your device to the PC with the USB data cable.
4. Wait for your PC to automatically search for the New Hardware Port and install the driver for your device. This takes 10-30 seconds according to PC specification.
5. When the software is correctly installed, your device will automatically open the Data Manager application and appear Connected.
6. You can now make the desired changes via PC Suite.
[Note] PC Suite for the Pantech Breeze IV works with Windows 2000 or XP family, Windows7, Windows 8, and Vista 32 bit. Your PC must have minimum 300MB of free disk space to install PC Suite.
If your device supports Bluetooth, your device has been basically tested and found to comply with the FCC and NAC. However, there is no gurantee that inteference will not occur.
In case Bluetooth connection is not functioning correctly, please try any of the steps below:
1. Make sure Bluetooth is turned on your device.
2. Check if the Bluetooth device you would like to pair is fully charged.
3. Make sure the Bluetooth device you are trying to pair is within 33 ft (10 meters) of your device.
4. Scan for devices first and attempt to pair when the device is found.
5. Bluetooth devices currently connected to other devices may not support pairing with your device. Turn off the connection of the other Bluetooth device first and try pairing it with your device.
Make sure you are in the area with good cell signal. To ensure it, see the signal strength indicator on the top right of your device screen.
If the bar is full, then please try any of the steps below:
1. Check if your device is set on Airplane mode. Undo it.
2. Check if the SIM card is inserted correctly.
3. After pressing the device number, make sure to press the dial icon.
4. Make sure not to block the device part where the internal antenna is located. Please see where the internal antenna is embedded on your device from the user manual.
The SIM card is the Subscriber Identity Module card that you receive with your device upon activation. It contains your network registration information and PIN code. The SIM card is physically installed in your device and one of its primary functions is to identify your device uniquely - apart from all other devices on the carrier's network.
The signal strength indicator on your device screen may display fewer bars at times even when you are in the area of good coverage, but this does not mean that your device is picking up less signal than other devices because all devices are differently designed to display the cell signal.
Do not cover or damage the device part where the internal antenna is embedded. It may be obstructing the device from better reception. Please see where the internal antenna is embedded on your device from the user manual.
Please try any of the steps below and then send a test email:
Applications may shut down altogether at once when you are running several applications simultaneously. This happens due to the memory capability of the device and is not a defect that needs to be repaired or exchanged with a new device.
Blocking the device part where the internal antenna is embedded may cause poor audio quality. Try not to attach a sticker or a protective film on the top of this part. Do not grab the device covering that part or touch it with your finger or metal during the call. Please review the user manual to locate the internal antenna.
Please try any of the steps below, if your camera does not work:
1. Make sure you have inserted and mounted microSD card onto your device.
2. Check if camera lens is dirty and clean the lens with a soft, dry cloth first.
3. Check if a seal is attached on the lens, please remove.
4. Take a picture in an area of adequate light and reamin still until the shutter sound is gone to avoid taking faded picture.
If your external keys or Home button are slow to respond, it may be due to applications running in the background. Please close all applications, turn off your device, remove and reinsert the battery and turn on the device. If the failure continues , your device may be defective and require repair service.
If an individual key is not functional, that key may be defective and require repair service.
Please try any of the steps below:
1. Check if microSD card is correctly inserted in your device. Turn off your device, pull out microSD card, put it in again and turn on your device.
2. Ensure the microSD card is not damaged. Memory cards formatted in other devices PC may not be recognized in your device.
3. Make sure microSD card is mounted on your device. Go to Settings > SD card & device storage and check if Unmount SD card is highlighted or else tap Mount SD card after power cycling your device.
4. Format microSD card before moving any files to it. Format is only enabled when microSD card is inserted in your device and unmounted.
5. If the file size to move or save onto your microSD card is too big, it takes longer time.
Charging time varies for each device. Charging time will also vary depending on the battery's voltage when charging is started. Generally speaking, for all batteries and all battery conditions, a full charge should be completed in less than 4 hours using the Pantech AC charging adaptor. If you are charging with a USB cable connected to a PC, the time to achieve a full charge may be longer. In either case, it will take longer than usual if you use the device while charging.
[Note] If the battery level is 10% or below, charging with AC adaptor is highly recommended.
Some applications do not allow keyboard/keypad inputs. Try using keys in other screens, and if the problem does not go away, restart your device after removing the battery.
If your device does not read the installed microSD card, try any of the steps below:
1. Check if microSD card is correctly inserted in your device. Turn off your device, pull out microSD card, put it in again and turn on your device.
2. Ensure the microSD card is not damaged. Memory cards formatted in other devices may not be recognized in your device.
3. Make sure microSD card is mounted on your device. Go to Settings > SD card & device storage and check if Unmount SD card is highlighted or else tap Mount SD card after power cycling your device.
4. Try formatting microSD card. Format is only enabled when microSD card is inserted in your device and unmounted.
5. If your device is connected to PC, device cannot access microSD card for PC to read it. Disconnect your device from PC and then try again.
The signal strength indicator on your device screen may display fewer bars at times even when you are in the area of good coverage, but this does not mean that your device is picking up less signal than other devices because all devices are differently designed to display the cell signal.
Do not cover or damage the device part where the internal antenna is embedded. It may be obstructing the device from better reception. Please see where the internal antenna is embedded on your device from the user manual.
If your device seems slow, try any of the steps below to improve the speed:
1. Adjust the Animation setting in Display settings by choosing No animations.
2. Power cycle your device (turn it off, then on again) to free memory that may be lacking by applications running in the background.
If your device memory is full, it cannot send and/or receive text messages. Please delete any messages currently in your inbox and outbox to enable messaging.
If the problem is not solved, please try any of the steps below:
1. Check if you are in coverage service area.
2. Check if your device is set on Airplane mode. If so, turn off.
3. Check if the SIM card is inserted correctly.
4. Check that you have not blocked certain messages such as Advertisement or messages from Anonymous Sender in Messaging Settings.
[Note] Text messaging is a feature provided from your carrier. You may have to add this feature to your plan and make a payment. At times, it may be disabled due to a problem on the carrier's end.
To display pictures stored on your microSD card using Gallery, make sure your device is not mounted as a USB storage device. When connected to a PC and PC is reading memory, your device cannot access microSD card.
Please try any of the steps below accroding to your problem:
1. If a photo is too dark or too light, adjust the Exposure Setting by selecting the Exposure icon (that looks like a sun) and changing the brightness level.
2. If the picture quality is grainy, adjust the Resolution Setting. 3 megapixel (2048x1536) images are optimal for best resolution.
3. If a picture is not in focus, select Auto Focus mode in Camera Settings.
4. Check if camera lens is dirty and clean the lens with a soft, dry cloth.
Your device could drop calls if you are outside or far from the call service area. Please check the signal strength indicator on your device screen and move to an area with good coverage.
Blocking the device part where the internal antenna is located, such as adding an attachment on it, touching it with a finger or metal during the call, or grabbing the device covering that part may also drop the call signal. Please see where the internal antenna is embedded on your device by reviewing the user manual.
The GPS signal reception may be interfered by obstacles such as bridges, forests, rainy, foggy or cloudy weather, tunnels, high-rise constructions, mountains, etc. It also cannot penetrate through solid and non-transparent objects. Please avoid these objects or area when connecting to GPS satellites.
Please try any of the steps below and then send a test email:
1. Confirm your account's Username and Password in Incoming/Outgoing server settings. It may be due to Authentication error.
2. If the account is set up properly, but you cannot send an email through the email provider's server, change your Incoming and Outgoing settings in Account settings. Try sending an email with each Security type - SSL and SSL(Accept all certificates).
3. Try sending email using Gmail or other email account. It may be the problem of email service provider's end.
4. Turn off the device, turn it on again and try sending a test email.
Having difficulties in finding your answers in the Product Manuals section?